Tutorial: How to setup your checking list and drilling list in Hydroman.
Goal:
Customizing your check list and drilling list.
Steps:
The layout file is used for the check list and the drilling list.
The first lines are just for information.
Picture 1
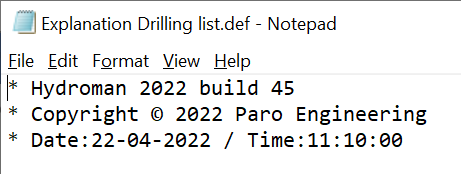
Use the * in front so it won’t be seen in the drilling list.
The next options contains the information for the layout for your check list and drilling list.
Picture 2
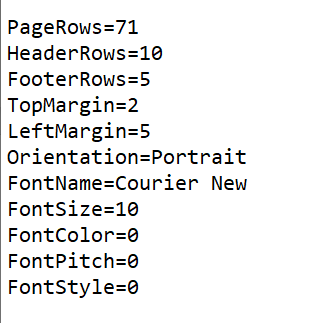
PageRows = how many lines there are used on the page between the header and footer.
HeaderRows = how many are used for the header.
FooterRows = how many lines are used for the footer.
TopMargin = where the drilling list starts from the top of the page.
LeftMargin = where the drilling list starts from the left of the page.
Orientation = Portrait or Landscape
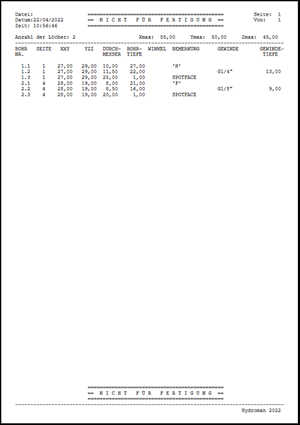
Picture 3
Portrait:
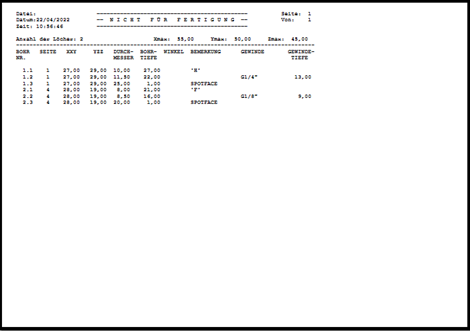
Picture 4
Landscape:
FontName = the font you want to use
FontSize = the height for the font you use
FontColor = the color you use for the drilling list. For example 255 and the text will be red.
FontPitch = the refers to the height of characters in a chosen font. Is normally not used anymore.
FontStyle = used to change the style of the font, for example 1 is bold and 2 is cursive.
The check list and drilling list uses variables:
For example FileName:
You can combined this with text, for example Datei.
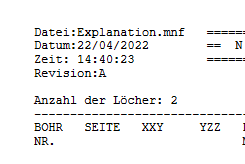
The filename is Explanation and the text in front Datei.
In the drilling list it looks like:
Picture 5
To use the variable you must enter it like this (see picture 6)
Picture 6
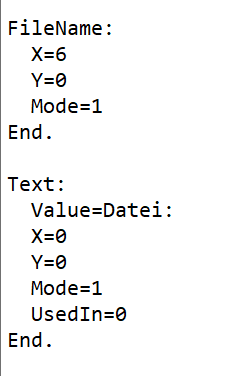
It is not important if FileName: comes first.
Text: may also be the first one.
The X and Y position depends on which mode is chosen.
There are 4 modes for the variable (for example FileName:) and text (for example Value=Datei:)
0 = the name is not used
1 = the name is used in the HeaderRows.
2 = the name is used in the FooterRows.
3 = the name is used between the header and footer.
So in this example(Mode=1) the starting position for the text is at the left upper corner (X=0 and Y=0) and the variable right behind it (X=6 and Y=0).
For Mode=2 the Y value start counting from the end of the page.
For Mode=3 the Y value is between the header and footer and determined automatically.
With the option UsedIn you can determine if it the text value is used in the check list or drilling list UsedIn has the following options 0, 1 and 3
0 = used in check and drilling list.
1 = used in the check list only.
3 = used in the drilling list only.
Variables used:
The following Variables are used for the check list and drilling list:
| Variables | |||
|---|---|---|---|
| FileName | FullFileName | Date | Time |
| PageNumber | TotalPages | TotalHoles | LastHole |
| XMax | YMax | ZMax | XXY |
| YZZ | X | Y | Z |
| XXX | YYY | ZZZ | HoleNumber |
| StepNumber | Pattern | FaceNumber | Diameter |
| Depth | Remark | Thread | Length |
| ConeDepth | Angle | AngleValue | AngleRotation |
| AngleX | AngleY | AngleV | AngleR |
| CheckList | ProgramTitle | ProgramCopyright | UserName |
| UserAddress | UserCity | ProjectTitle | ProjectNumber |
| ProjectClient | ProjectDrawing | DrawnBy | CheckedBy |
| Revision | ToleranceDiameter | ToleranceDepth | LengthFromShoulder |
| CurrentTime | CurrentDate | Pressure | Material |
| ManufacturingNote | LocatingShoulder | HoleRevision | MachineCode |
| TopAngle | Rev1No | Rev2No | Rev3No |
| Rev1Description | Rev2Description | Rev3Description | Rev1DrawnBy |
| Rev2DrawnBy | Rev3DrawnBy | Rev1CheckedBy | Rev2CheckedBy |
| Rev3CheckedBy | Rev1Date | Rev2Date | Rev3Date |
| Rev1Code | Rev2Code | Rev3Code | Checker |
| IntersectWith | |||
To see the definition file used in this example see here Check and drilling list setup.